 Uniform Server is an open source lightweight mobile WAMP server that I use as a local web development environment. The version in this update is: 12.0.1_Zero XII. After UniServer, I installed the latest WordPress.
Here’s the problem. I go through and set something up, like the UniServer Dev Environment. It’s working beautifully. Then, a few months go by and there’s an update. Oh, goodie, I want the latest and greatest. What should be quick and easy ends up being a real pain. Well, it’s a pain because I didn’t document it the first time. Duh!
There were two tricky parts in setting this up. The first was a dependency on an x86 version of Visual C++ runtime on my x64 system and setting up the WP Config with those rip-your-hair-out “Can’t Connect to Database Errors.”
Installing WordPress on UniServer
INSTALL UNIFORM SERVER
1a. Install Uniform Server Zero XII. Clicking on the executable asks for an install directory. For a normal install, you’re limited to the root (C:\). If you’re using my magic batch file, you can run it anywhere using start.bat. Otherwise, in the root directory launch with UniController.exe. Start Apache and MySQL by pushing the buttons.
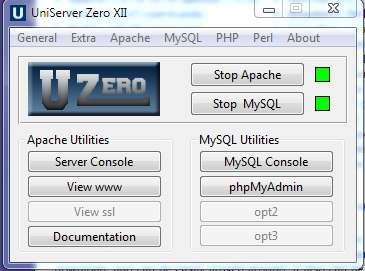
Now, if you get an error message when you press the Apache button, you need to update the Visual Studio 2015 C++ Redistributable.
https://www.microsoft.com/en-us/download/details.aspx?id=49984

Here’s the crazy thing. I’m running on x64, but I had to install both x64 and x86 versions of the software. The downloads are on the same page.
1b. Turn off UniServer Nag for MySQL database password.
Go to home > us-config > us_config.ini
Change Nag_user=true to Nag_user=false
What this means is that the username for the SQL database is root and the password is blank or whatever you set it. In my case, it’s root (see 2b.).
1c. Change Default Port
My previous development environment was InstantWP. This used listening port: 4001
I think this had to do with security or something like that. Anyway, I decided to use this with UniServer too.
1. Turn off Apache in the Uniserver console.
2. Go to Apache > Edit Basic and Modules > Edit Basic Configuration
3. On Listen port change the default value (80) to 4001
4. Hit the Update Configuration button and you’re good to go.

PHP Extras.
In the UniServer Control Panel, PHP > Edit Basic and Modules > PHP Modules Enable/Disable, you might need to turn on some other modules for other CMS programs. These are some that I turn on:
- php_curl
- php_fileinfo
- php_opensll
INSTALL WORDPRESS
2a. Install WordPress.
1. Download the latest WordPress.
2. Inside the zip file, there is a directory called wordpress. Unzip this folder and put it into UniserverZ > www

2b. Change the MySQL database password to root.
1. In the UniServer Panel, go to MySQL > Change MySQL Password
2. Enter root and press OK.

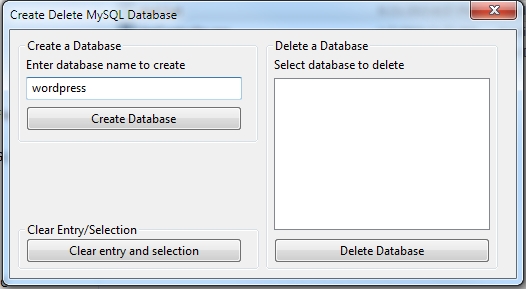
2c. Create wordpress database.
1. In the UniServer Panel, press the Start MySQL button.
2. In the UniServer Panel, go to MySQL > Database create-delete
3. For the database name, enter wordpress and press Create Database
4. Press [ x ] to exit.
2d. Setup WP-Config.
1. Make sure both Apache and MySQL are running (green).
2. In the browser type: http://127.0.0.1:4001/wordpress
3. Select Language and Continue.

4. Press Let’s go!

5. Enter Data.
Database Name: wordpress
User Name: root
Password: root
Database Host: 127.0.0.1

6. Press Submit
7. There should be a message that starts: “All right, sparky!”

8. Press Run the Install.
9. Enter in the Information.
Site Title: WordPress
Username: admin
Password: password (confirm weak password)
Email: admin@site.com

10. Press Install WordPress.
11. Login with admin and password. http://127.0.0.1:4001/wordpress/wp-login.php
That’s it! Now, the really neat thing is that the development environment is now self-contained in the folder and you can do the WordPress updates without having to go through all this happy good stuff again. Add the Start.bat file, zip up the folders, and save it in a nice, safe place with a name that you might remember (UniServerZ_WP). Next time you want to play, unzip and it’s ready for some serious DevelopRx action.


